
5 Tips for Real Estate Photos from A Professional
Regardless of what gear you’re using, if you follow these tips for real estate photos, you’ll come away with better looking images. Although it is helpful to have a wide angle lens and decent camera, they are not completely necessary.
Whether you’re working with a phone or a professional camera, these tips for real estate photos are universal. Additionally, if you are looking for real estate photography courses to help you take better photos, check out our article Best Real Estate Photography Classes.
Table of Contents
Take Advantage of Natural Light
Probably the most important of all the tips for real estate photos, natural light is your best friend when photographing real estate. If the space you’re photographing has windows letting in a decent amount of natural light, you’ll surely be able to come away with some quality photos.
Take note of where the windows are, how the light is coming through them, and where it looks the best.
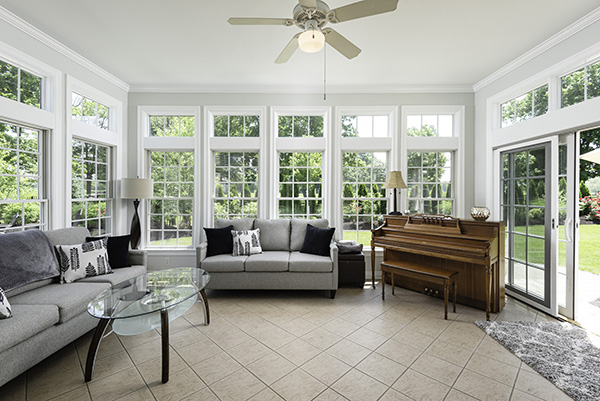
In this image, natural light is coming in from all angles, so I fit as many windows as possible into the frame and let the natural light do the rest of the work.
Always remember, light is the most important part of photography. If you can find the well lit areas of the home, you will be able to take some great real estate photos.
For a deeper explanation, read this article explaining why natural light is so important and how to best use it to photograph interiors: Comprehensive Guide to the Best Lighting for Interior Photography
Use A Tripod
Sometimes we won’t get as much natural light in a room as we’d like and that’s where the importance of a tripod comes into play. A tripod allows you to take longer exposures, which means that you will allow more light into the camera. An extremely important part of photographing interiors.
Put your camera, or even your phone, on a tripod and the quality of your photos will noticeably take a big step up. If you’re not quite sure what settings to use once your camera is on the tripod, read this article I wrote featuring The Best Camera Settings for Real Estate Photos.
Finally, if you don’t yet own a tripod, check out this article: 7 Best Tripods for Real Estate Photography
Stage the Room
Staging the room can be as easy as decluttering the space. The first thing I do when I get into a house I’m about to photograph is a quick walkthrough. I identify how much staging will need to be done and then start to put things into place.
Sometimes this is as simple as moving a few curtains or fluffing some pillows, but other times it can mean rearranging a kitchen or even moving some furniture. Either way, properly staging a room is something not to be over-looked.
Ideally, you want the space to be as clean and decluttered as possible. My general rule is always a “less is more” type approach. I’ll leave some things in the photo (coffee makers, cookware, etc.) if they are in good condition, but for the most part, I take a lot out of the frame before even turning my camera on.
Remember that you do have some control over what the room looks like. If that rocking chair in the living room makes the room look too cluttered and it’s easily moved, go ahead and get it out of the frame. Long story short, don’t be afraid to move things.
For a complete guide to home staging, check out this article: Complete Home Staging Checklist
Keep Your Lines Straight
Straight lines simply make photos look better. Point blank. I see so many real estate photos where the camera is pointed up or down, which in turn makes the walls seem as though they are collapsing into the photo. This is a problem that is so easily fixed.
Most cameras come with some sort of level function that shows you whether or not you are holding your camera level. Look around in your menu functions and turn it on if available.
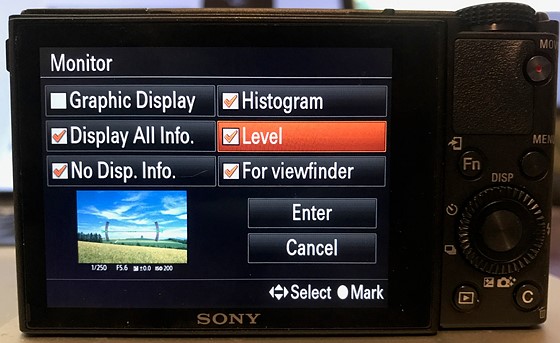
If your camera doesn’t have a level function, just do your best to make sure the vertical lines in your photos look as straight as possible. Both of the photos above are excellent examples of proper vertical lines.
Use Editing Software
Using an editing software is going to be extremely helpful. The best editing software out there is Adobe Lightroom and Photoshop. You can gain access to both for only $9.99/month, or even less if you choose to pay annually.
Although I personally use and highly recommend Adobe Lightroom and Photoshop, I also realize that those programs aren’t in everyones skillset and you might be looking for a much easier option.
There are a number of solid free editing softwares out there and some of the best are just apps on your phone. Even the simple photo editing tools that come standard on your iPhone or Android device will improve your final images.
If we’re being honest, the programs that come preinstalled on your Apple or Mac computer are probably more than enough to get your started. Brighten up the photos a bit, add a bit of sharpness and contrast, pull the shadows and if there is a “lens correction” tool, go ahead and use that as well.
If you’re don’t like the preinstalled editing software on your computer, check out Google Photos as another free alternative. Also, make sure to check out this article: Best Editing Software for Real Estate Photography
Tips for Real Estate Photos and Additional Resources
Be sure to check out our Beginners Guide. It’s full of articles with helpful ideas and tips for real estate photos exactly like this one. Our Business Resources page has all the resources you’ll need to get your Real Estate Photography business started on the right path.
Finally, go check out our Gear page to get up-to-date reviews and recommendations on todays best gear for Real Estate Photography.
Frequently Asked Questions
How do you take good quality pictures in real estate?
The number one things you can do to take better quality pictures in real estate is use a wide angle lens. After that, following all the tips above will help quite a bit.
How do I stage my home for real estate photos?
Read this article: Complete Guide to Staging a Home for Real Estate Photos
What time is best to shoot real estate photos?
Generally speaking, right around 12:00pm is the best time for interior real estate photography. This is because there isn’t too much direct sunlight coming through the windows which can make photography difficult.
20 Comments