
Real Estate Photography Checklist
When just getting started, using a real estate photography checklist is an easy way to make sure you don’t make any simple mistakes. Early on in your real estate photography career, you will absolutely want to make sure that you limit your mistakes so your clients keep coming back.
You won’t need a checklist forever, but it’s best to bring one along with you until you’re confident with your on location real estate photography routine.
Table of Contents
Free Real Estate Photography Checklist
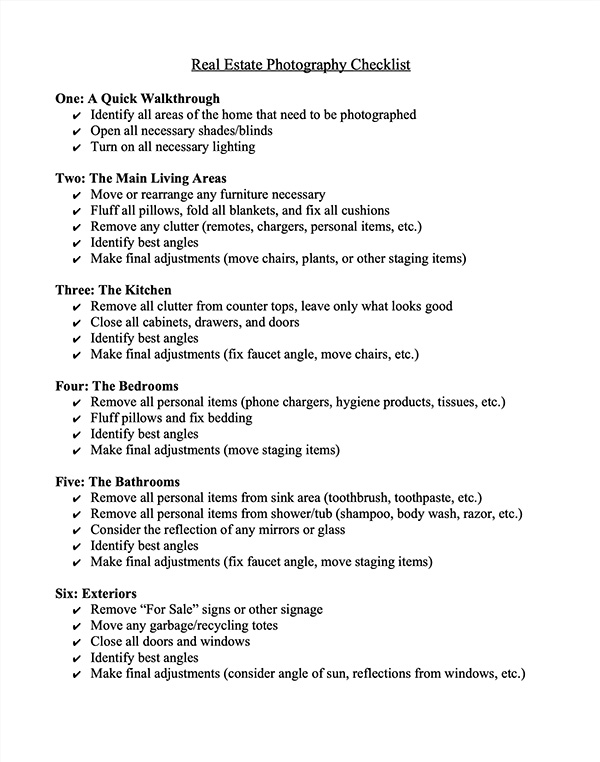
Download our Real Estate Photography Checklist and insure that you will come away from your shoot with all the photos you’ll need to make your client happy.
How to Use A Real Estate Photography Checklist
The best way to use this real estate photography checklist is to have it easily accessible throughout your whole shoot. Whether you print out a hard copy to carry around with you, or keep the PDF on your phone, you’ll want it readily available.
When you get to the property you’re photographing, pull out the checklist and go through it slowly. It’s broken down by rooms/areas of the house to make everything as easy as possible.
You’ll want to start with a walkthrough to identify all the areas of the home that you’ll need to photograph, then move on to the more specific instructions. Take your time on the walkthrough and be sure to ask any questions you might have if the realtor or homeowner is present.
Only click the shutter once you’ve gone through all of the items listed for the room that you’re about to photograph. Once you’re confident that everything is set up properly, go ahead and capture the image.
Using this free real estate photography checklist will help you capture better photos early on in your real estate photography career. It’s easy to be a bit overwhelmed at first and forget to do something small like close kitchen cabinets.
When you look at the final photos though, you’ll really wish you closed that cabinet or fixed that blanket on the bed. It takes such a small amount of time and can really increase the overall quality of your final image.
Realtors are always appreciative of you doing the small things. They will notice that you fluff pillows and fix the way the faucet is facing. Using a real estate photography checklist is a great way to impress your clients right out of the gate.
Additional Resources on Real Estate Checklists
We also have a Free Home Staging Checklist which you can use to stage a house yourself, or give to a realtor ahead of time to make sure the home is photography ready when you arrive.
Be sure to check out our entire Beginners Guide as well. It’s full of helpful advice, articles, and resources to get your real estate photography business started on the right path.
Our Gear page has reviews and recommendations on all the latest real estate photography equipment as well.
Frequently Asked Questions
How do I prepare for a real estate photoshoot?
The best way to prepare is to have a checklist to make sure that you don’t accidentally miss any shots. Additionally, staging the home is a great way to prepare.
What settings should I use for real estate photography?
Check out this article: Best Camera Settings for Real Estate Photography
What is the best time of day to take real estate photos?
Generally speaking, right around 12:00pm is the best time for interior real estate photography. This is because there isn’t too much direct sunlight coming through the windows which can make photography difficult.
How do I stage my home for real estate photos?
Check out this article: Complete Home Staging Checklist
36 Comments