
How To Use The Tone Curve In Adobe Lightroom
Understanding how to use the Tone Curve in Adobe Lightroom can significantly enhance your real estate photography, allowing you to create images that really stand out. We even named Adobe Lightroom the Best Editing Software for Real Estate Photography.
In this article I’ll share how to use the tone curve in Adobe Lightroom and talk about some best practices when doing so for real estate photography.
Table of Contents
Understanding the Tone Curve
The Tone Curve represents the image’s tonal range, plotted on a graph, where the horizontal axis represents the original tones (shadows to highlights), and the vertical axis represents the adjusted tones. Manipulating the curve allows you to control the brightness and contrast of different parts of your image.
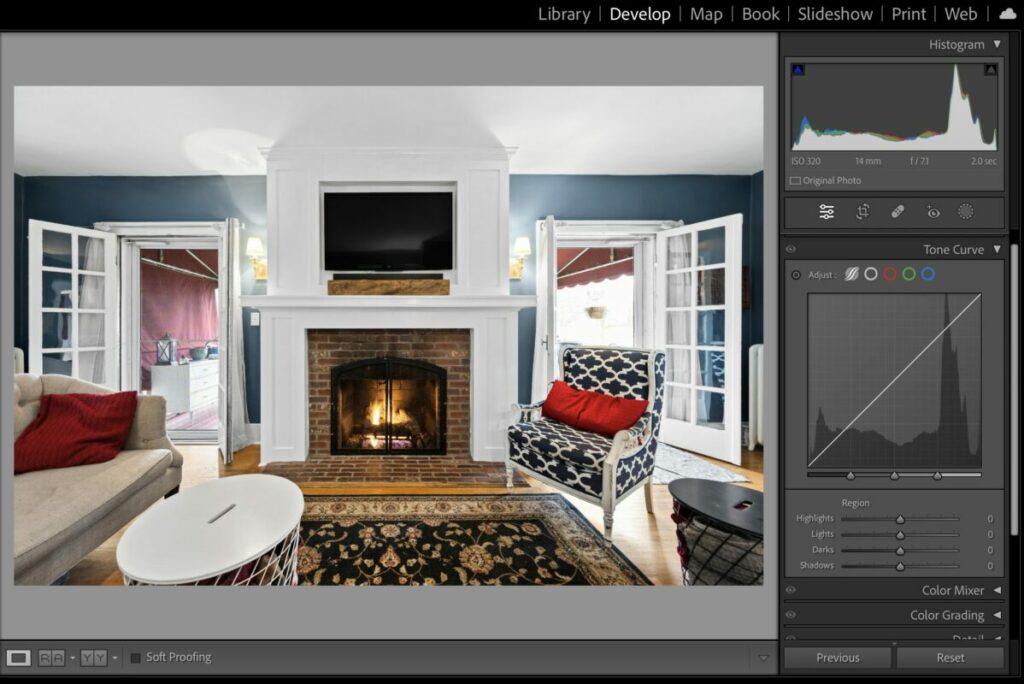
In Lightroom, the Tone Curve is located in the Develop module, under the Tone Curve panel. Initially, you might see a simplified version, with sliders for Highlights, Lights, Darks, and Shadows. You can see it in the image above on the right hand side.
However, for more precise adjustments, click on the button in the lower right corner of the panel to switch to the point curve, which provides full control.
Adjusting the Tone Curve for Real Estate Photography
Setting the Black and White Points
Start by setting the black and white points to ensure your image utilizes the full tonal range. In real estate photography, this step ensures that your interior shots are bright and inviting while preserving detail in both the darkest and brightest areas.
Creating Contrast
A common adjustment is creating an ‘S’ curve by adding two points on the curve: one in the shadows and one in the highlights.
Dragging the shadow point down darkens the shadows, while pulling the highlight point up brightens the highlights, increasing the overall contrast. This adjustment can make your real estate photos pop, emphasizing textures and details.
Adjusting Midtones
The midtones often contain the critical details of your real estate photos, such as the wood grain of floors or the texture of walls.
To adjust the midtones, add a point in the middle of the curve. Moving this point slightly up can brighten the image without affecting the darkest and lightest parts, making the space appear more welcoming.
Fine-Tuning with the RGB Curve
The Tone Curve in Lightroom also allows adjustments in individual color channels (Red, Green, and Blue), enabling you to correct color casts or enhance specific colors in your image.
For example, if an interior photo has a yellow cast from tungsten lighting, you could slightly lower the red and green channels to balance the colors.
Best Practices for Real Estate Photography
Subtle Adjustments
When editing real estate photos, it’s crucial to keep adjustments subtle and natural. The goal is to enhance the photo to represent how the property feels in person, not to create an overly stylized image that could mislead potential buyers.
Consistency Across Photos
Maintain consistency in tonality and color across all photos of a property. This consistency is vital for real estate listings, as it provides a cohesive and professional presentation. You can save your Tone Curve adjustments as presets for easy application to other photos.
Highlighting Features
Use the Tone Curve to highlight unique features of the property, such as the natural light in a room or the view from a window. By carefully adjusting the curve, you can draw attention to these selling points, making the property more appealing to potential buyers.
Common Mistakes to Avoid
Overediting
Resist the temptation to overedit. Excessive contrast or unnatural colors can distract from the property’s actual beauty, potentially deterring interested parties.
Ignoring the Histogram
Always keep an eye on the histogram while adjusting the Tone Curve. Ensure that your adjustments don’t clip highlights or shadows too much, which would result in loss of detail.
Forgetting to Preview Changes
Frequently toggle the before-and-after view to ensure your adjustments are improving the image. Sometimes, stepping back and comparing can help you catch overadjustments.
Additional Resources
If you’re just getting started in real estate photography, check out our Beginners Guide. It’s full of helpful articles and tips that will guide you in the right direction as you begin your real estate photography journey.
You can check out our Gear section as well to see reviews and recommendations on the latest real estate photography gear.
If you’re more interested in other resources that can help your real estate photography business, check out our Business Resources page.