
Camera Settings For HDR Real Estate Photography
HDR photography is extremely popular in the world of real estate photography. Luckily, today’s top camera makers include features that make figuring out camera settings for HDR real estate photography fast and easy.
The included feature for HDR photography will differ from camera to camera, but they will all be performing the same general function. Whats most important is for you to understand what you need from your camera in order to produce the best possible HDR real estate photo.
Nailing The Camera Settings For HDR Real Estate Photos
Use the following steps to nail your camera settings and you’ll be able to capture a quality HDR image every time you’re on a job. Remember, it’s important that you gain a full understanding of why these steps are taken rather than just following them blindly.
The more you understand about HDR photography, why it works so well for Real Estate Photography specifically, and how your camera can best capture the exposures necessary, the better your images will look.
Understanding HDR
HDR stand for High Dynamic Range. In practice, HDR photography is when you capture multiple exposures at different shutter speeds which allows for the blending of images during post processing.
To put it simply, you will capture at least one over-exposed image, a perfectly exposed image, and at least one under-exposed image. Then, you will upload the files to an editing software like Adobe Lightroom or Photoshop and blend them together.
In theory, you will be able to use the best lighting from each exposure and blend them all together to make one, perfectly lit photograph. In practice, this takes a bit of editing skill, but as long as you get the settings correct when you’re on the job, you’ll be able to create a great image later on.
Why HDR Works Well For Real Estate Photography
As stated in the beginning of this article, HDR photography is extremely common amongst real estate photographers. If you’re willing to learn how to edit HDR images or hire an editor that specializes in HDR editing, you’re going to be able to capture some really great real estate photography images.
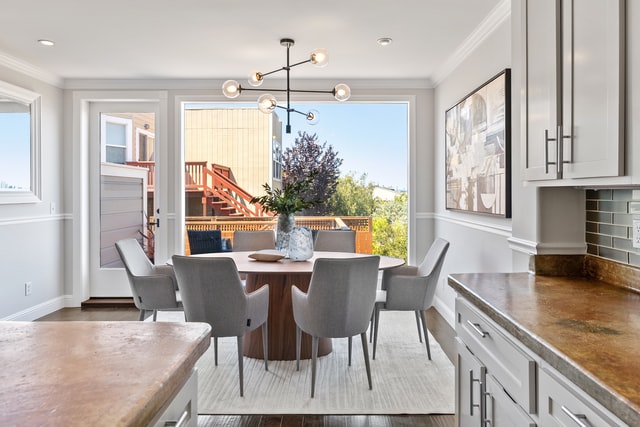
I’ll illustrate the benefits and implementation of HDR photography by using the images you see below.
The image above was taken using Aperture Priority mode. Using Aperture Priority mode allows the camera to pick the best exposure settings for this image. This is our baseline image that will be used in post processing.
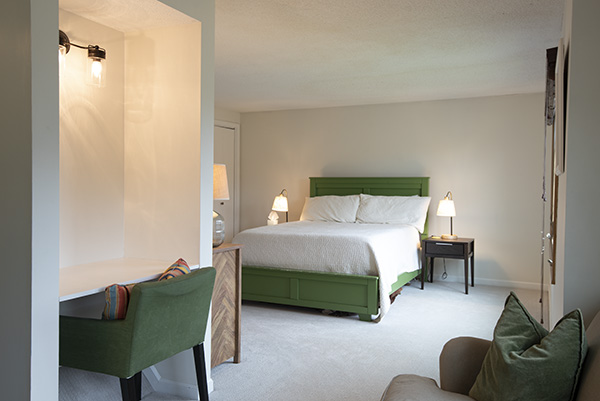
As you can see in this second photo, the image is over-exposed and everything is very bright. In post processing this image will be used to fill in the darker areas of the original image.

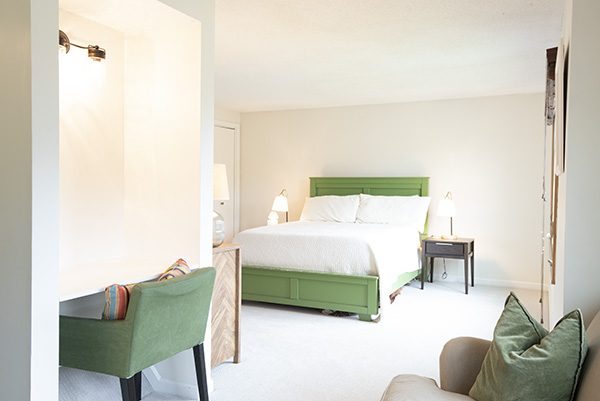
This third photo is under-exposed and will be used to tone down any areas that are too bright in the original image.
A skilled editor will use the best light from every exposure to create a perfectly lit image. This is a major advantage of using HDR techniques to photograph real estate, especially when compared to single image photography.
Using Stops To Properly Expose Each Image
Stops are a way of determining how much light is being let into the camera. A stop is either letting in twice as much light as the previous image, or half as much light as the pervious image. The math can become a bit confusing for some, so heres an example:
Say you are photographing a kitchen using Aperture Priority Mode and the following settings:
- Aperture of F/8
- Shutter Speed of 1/20
- ISO of 200
If you wanted to increase your exposure by 1 stop, you would be letting twice as much light into the camera. That means the next image would be shot using the following settings:
- Aperture of F/8
- Shutter Speed of 1/10
- ISO of 200
You’ll notice the only thing that changed between the settings is the shutter speed. The shutter speed went from 1/20 to 1/10, letting in twice as much light as before. The same will happen if you want to decrease your exposure by 1 stop, but instead of the shutter speed changing from 1/20 to 1/10, it will change to 1/40, thus letting in half the amount of light as before.
If all of that is still a bit too much to handle, then fear not! Most cameras will be able to do this automatically. Whats important is that you understand the idea of increasing stops to let in more light and decreasing stops to let in less light.
Auto Exposure Bracketing
Now that we have a good general understanding of what the needed camera settings for HDR real estate photography are, the first thing you should do is figure out how to set up your camera’s version of Auto Exposure Bracketing.
Using Auto Exposure Bracketing will make sure that you’re getting the correct exposures every time and will really speed up your time spent on location. It will make it so you only have to click your shutter once and let your camera do the rest. All it takes is a bit of programing and then you’ll be set.
Since each camera will be slightly different, it’s important that you figure out how to access this menu for your model. Although the menu names may be different, the settings we are going to be inputting will be the same regardless of camera brand or model.
- Set the camera to Aperture Priority Mode.
- Access your Bracketing Menu and set the amount of images captured to 5 and the interval of stops to 3.
- Make sure your aperture is around F/8 and your ISO is at a low level.
- Make sure that the Auto Exposure Bracketing function is activated.
- Place your camera on a tripod and perform a test.
- If you camera automatically captures 5 images all at different exposures, then you’re set!
You’ll now have 5 separate images all at different exposures that you or an editor can blend together in the editing program of your choice. Some real estate photographers only use 3 different images, but when you are first starting out its safer to capture 5 images and allow yourself some room for error.
Learning The Best Camera Settings For HDR Real Estate Photography
As you continue to photograph real estate using these camera settings for HDR photography keep in mind that like every other part of photography, it’s going to take practice to achieve the best possible results.
HDR photography allows us to let the camera do most of the heavy lifting, but it’s still up to us as the photographer to make sure that the images our camera is capturing are correct. Call it a quality control type situation.
Your camera is not going to get it right 100% of the time. If you are looking at the images and you think you’ll need a brighter photo because it’s a really dark space, go ahead and take one. It’s better to overshoot while on location than to sit down at your computer and realize you don’t have the right exposures.